Is securing your IoT devices a challenge in today's interconnected world? It absolutely is, and mastering SSH for remote access is no longer optional, but a critical skill for anyone involved in the Internet of Things.
The proliferation of IoT devices is undeniable. From smart home appliances and industrial sensors to medical devices and environmental monitors, these interconnected objects are generating vast amounts of data and performing critical functions. However, this interconnectedness also introduces significant security risks. Without proper security measures, IoT devices can become vulnerable to cyberattacks, potentially compromising sensitive data, disrupting operations, and causing significant financial and reputational damage. SSH (Secure Shell) stands as a robust solution, providing a secure and encrypted channel for remote access and management of these devices. This comprehensive guide will walk you through the intricacies of setting up and utilizing SSH to fortify your IoT infrastructure.
Whether you're a seasoned IT professional, a budding developer, or simply curious about securing your connected devices, this step-by-step exploration will equip you with the practical knowledge and essential tools to establish secure and reliable connections. We'll delve into the core concepts, navigate the setup process, explore best practices, and unlock advanced features, empowering you to manage your IoT devices with confidence and protect your valuable data. Let's embark on this journey and fortify your IoT landscape with the power of SSH.
- Who Is Mo Vlogs Sister Discover Aisha Vlogs Life
- Drakescan Your Crypto Tracking Powerhouse 2024 Guide
Table of Contents
- Introduction to SSH
- Why Use SSH for IoT Devices?
- Prerequisites for SSH Remote IoT Device Connection
- Setting Up an SSH Server on Your IoT Device
- Connecting to Your Remote IoT Device via SSH
- Security Best Practices for SSH
- Troubleshooting SSH Connections
- Advanced SSH Features for IoT Devices
- Automation with SSH for IoT Devices
Introduction to SSH
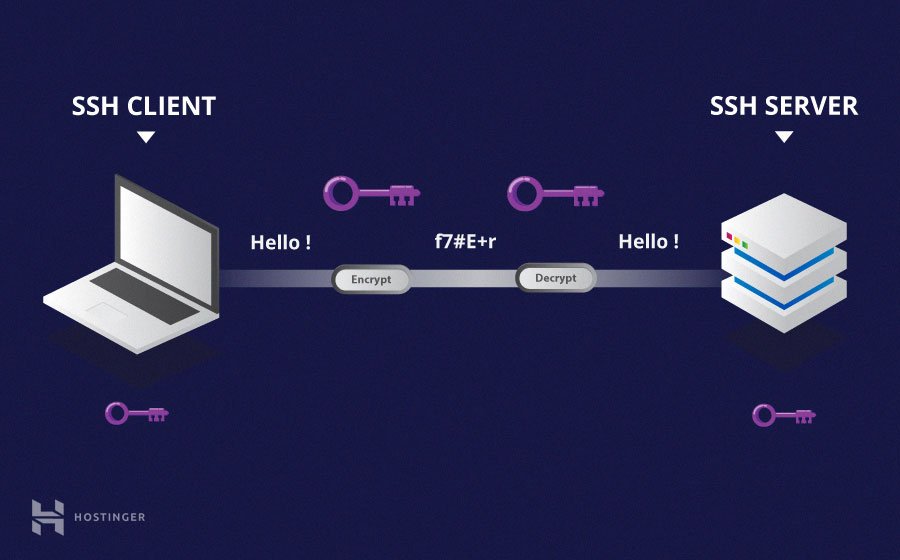
SSH, or Secure Shell, is a fundamental network protocol that allows for secure communication between devices over an unsecured network. Its primary function is to establish a secure channel for remote access, enabling administrators and authorized users to manage systems, transfer files, and execute commands remotely. The core of SSH lies in its ability to encrypt all data transmitted between the client and the server, thus ensuring confidentiality, integrity, and authentication.
Operating by default on port 22, SSH provides a significant upgrade over less secure protocols like Telnet and FTP, which transmit data in plain text, making them vulnerable to eavesdropping and man-in-the-middle attacks. SSH's robust encryption algorithms and authentication mechanisms safeguard against these threats. Furthermore, SSH is widely supported across various operating systems, including Linux, macOS, and Windows, making it a versatile and adaptable solution for a wide array of applications.
In the rapidly expanding landscape of IoT devices, SSH takes on an even more critical role. It serves as a secure gateway for managing and maintaining remote systems. Whether you're fine-tuning sensors, gathering environmental data, or updating the firmware of a device located in a remote location, SSH ensures that your interactions are shielded from unauthorized access and potential data breaches. This ability to remotely manage and secure IoT devices is crucial, given the increasing number of deployments in environments where physical access is difficult or impossible.
- Princes Height The Iconic Musicians Bio Legacy
- Unveiling David Tennants Brother Familys Impact On His Career
Why Use SSH for IoT Devices?
Choosing SSH for managing your IoT devices offers a multitude of advantages compared to alternative communication protocols. SSH's design, focusing on security and reliability, makes it particularly well-suited for the unique challenges of the IoT environment. Here's a breakdown of the core benefits:
- Encryption: SSH employs robust encryption algorithms to encrypt all data transmitted between devices. This encryption effectively prevents eavesdropping, ensuring that any sensitive data exchanged, such as configuration settings, sensor readings, or control commands, remains confidential. Moreover, encryption protects against data tampering, guaranteeing that the integrity of the data is maintained throughout the communication process.
- Authentication: SSH provides robust authentication mechanisms, safeguarding access to the device. It supports various authentication methods, including password-based authentication, where users authenticate using a username and password, and public-key authentication, which is considered more secure. Public-key authentication relies on cryptographic keys to verify the identity of the user, making it significantly harder for unauthorized users to gain access. These authentication methods ensure that only authorized individuals can interact with the IoT device.
- Compatibility: SSH boasts remarkable compatibility, supporting a wide array of IoT platforms and operating systems. This compatibility enables seamless integration into existing systems without requiring extensive modifications or compatibility issues. Regardless of the specific hardware or operating system your IoT device utilizes, SSH offers a consistent and reliable solution for remote management and secure access.
- Reliability: SSH connections are designed to be reliable and robust, even in challenging network conditions. It is designed to handle intermittent network connectivity and packet loss without disrupting the connection. This is especially important for IoT devices that may be deployed in areas with unstable or unreliable internet connections. SSH ensures that you can maintain control and access to your devices even when the network is less than ideal.
These key features combine to make SSH an ideal solution for securing IoT devices, especially in remote or potentially untrusted locations. The ability to ensure confidentiality, authenticate users, and maintain reliable connections is essential for protecting sensitive data and ensuring the proper functioning of these critical systems.
Prerequisites for SSH Remote IoT Device Connection
Before you dive into setting up SSH for your IoT device, it's crucial to ensure you have the necessary hardware and software components in place. This preparation will streamline the setup process and guarantee a smooth and successful implementation.
Hardware Requirements
The following hardware components are essential for establishing an SSH connection to your IoT device:
- An IoT device with an SSH-capable operating system (e.g., Raspberry Pi, ESP32 with Linux). This device will act as the target of your remote connection. The choice of the operating system is essential for SSH support.
- A stable internet connection or local network access. This provides the communication channel between your local machine and the IoT device. A reliable network connection is critical for consistent remote access.
- A computer or laptop with an SSH client installed (e.g., PuTTY for Windows or Terminal for macOS/Linux). This will be the device you use to connect to and manage your IoT device remotely.
Software Requirements
In addition to the hardware components, you will also need the following software tools:
- An SSH server installed on your IoT device (e.g., OpenSSH). This is the software that allows your IoT device to accept and manage SSH connections.
- An SSH client on your local machine. The client software establishes the connection to the SSH server running on your IoT device.
- Basic knowledge of command-line operations. This is necessary for navigating the operating system and executing commands on both your local machine and the IoT device, as you will be interacting with the device via the terminal interface.
Having these prerequisites met will ensure a seamless and straightforward setup process for SSH remote access to your IoT device, setting you up for secure and efficient device management.
Setting Up an SSH Server on Your IoT Device
Setting up an SSH server on your IoT device is a critical step in enabling secure remote access. Here's a step-by-step guide to get you started:
Step 1
The process of enabling SSH will vary depending on the specific operating system running on your IoT device. Here's how to enable SSH on a popular example, a Raspberry Pi running Raspbian:
- Open the Raspberry Pi Configuration tool by typing `sudo raspi-config` in the terminal. This command launches the configuration utility.
- Navigate to "Interfacing Options" and enable SSH. This is usually a straightforward selection.
- Reboot your device to apply the changes. This restart ensures that the changes take effect, and the SSH service starts automatically.
Step 2
If your IoT device doesn't already have an SSH server, such as OpenSSH, installed, you'll need to install it. Here's how you can do it:
sudo apt update && sudo apt install openssh-server
This command updates your package list and then installs the `openssh-server` package, which includes the necessary files for SSH functionality on your device. This process will install all of the crucial elements of the SSH server, allowing other devices to connect to your IoT devices.
Step 3
Once the SSH server is installed, you can customize its settings to enhance security and tailor the connection to your specific needs. The primary configuration file for OpenSSH is `/etc/ssh/sshd_config`. Here's how to get started:
sudo nano /etc/ssh/sshd_config
Using a text editor such as `nano`, you can modify the `sshd_config` file. This file allows you to customize several important settings, including:
- Changing the default SSH port (e.g., from 22 to a custom port). Changing the default port reduces the risk of automated attacks that target the common port 22.
- Disabling password authentication and enabling public-key authentication for added security. Disabling password authentication and using public-key authentication dramatically improves security. Public-key authentication is significantly more secure because it relies on cryptographic keys rather than easily guessable passwords.
Remember to save the changes to the configuration file and restart the SSH service for the changes to take effect. You can usually do this with the command `sudo service ssh restart`. Be careful when modifying the SSH configuration, as incorrect settings could potentially lock you out of your device. Always double-check your changes before saving the file, and ensure you have a backup plan in place.
Connecting to Your Remote IoT Device via SSH
After successfully setting up the SSH server on your IoT device, the next step is to establish a secure connection. This process is relatively straightforward, but it's essential to ensure you have the necessary information before proceeding.
Step 1
Before you can connect to your IoT device, you'll need its IP address. This is the unique identifier that allows your local machine to locate and communicate with the device on the network. There are several ways to identify the IP address. Here's a command you can run directly on your IoT device's terminal to retrieve its IP address:
hostname -I
Executing this command will display the IP address assigned to your device. This is usually the quickest and easiest method to get your device's IP address, particularly if you have direct access to the device's terminal.
Step 2
With the device's IP address in hand, you can now use an SSH client to connect to it from your local machine. The process involves a simple command:
ssh username@device_ip_address
Replace "username" with the appropriate user account on your IoT device. This should be an existing user account with the necessary permissions to access the system. Replace "device_ip_address" with the actual IP address that you obtained in the previous step.
When you execute this command, the SSH client will attempt to connect to the IoT device using the provided username and IP address. You will likely be prompted to enter the password for the user account on your device. If you've set up public-key authentication, you may not be prompted for a password. Once the authentication is successful, you'll be granted access to the device's command line, allowing you to execute commands and manage the system.
Security Best Practices for SSH
While SSH provides a secure foundation for communication, it's imperative to fortify your setup with robust security practices. Implementing these measures will significantly reduce the risk of unauthorized access and mitigate potential cyber threats. Remember that security is a continuous process and regular review and updates are essential.
- Use Strong Passwords: Avoid using weak or easily guessable passwords for SSH accounts. Employ complex passwords that include a mix of uppercase and lowercase letters, numbers, and symbols. Consider using a password manager to generate and store strong, unique passwords. Change passwords regularly and avoid reusing passwords across multiple accounts or services.
- Enable Public-Key Authentication: Prioritize public-key authentication over password-based authentication. Public-key authentication is inherently more secure, as it relies on cryptographic keys rather than passwords. Generate a key pair, store the private key securely on your local machine, and install the public key on your IoT device. This approach virtually eliminates the risk of password-based attacks.
- Change Default Port: Change the default SSH port (22) to a custom port to reduce the risk of automated attacks. By changing the default port, you make your SSH server less visible to automated bots that scan for vulnerabilities on the standard port. Choose a port number outside the common range to further obscure your server.
- Limit User Access: Restrict SSH access to specific users or groups to minimize potential security risks. Limit the number of users who have SSH access to the device. This reduces the attack surface and limits the potential damage in the event of a security breach. Use the principle of least privilege, granting users only the minimum permissions necessary to perform their tasks.
By consistently applying these security best practices, you can create a secure and robust environment for managing your IoT devices. Remember that security is not a one-time effort; it's an ongoing process that requires vigilance and proactive measures.
Troubleshooting SSH Connections
Even with the proper setup, you may occasionally encounter issues when connecting to your IoT device via SSH. Here are some common problems and their solutions:
- Connection Refused: This error usually indicates that the SSH server is not running on the IoT device, or that a firewall is blocking SSH traffic. To troubleshoot this, ensure the SSH server is started (use `sudo service ssh status` to check its status). Verify that your device's firewall allows incoming connections on the SSH port.
- Incorrect Credentials: Verify that the username and password, or the public key, are correct. Double-check for any typos or case sensitivity issues. If you're using public-key authentication, make sure your private key is properly loaded on your SSH client and that the corresponding public key is installed on the IoT device.
- Network Issues: Network problems can also prevent SSH connections. Check the device's network connection and ensure it has a valid IP address. Verify that your local machine and the IoT device are on the same network (or that your network configuration allows for routing between them). Test your internet connection to ensure there are no wider network outages.
If the issue persists, consult the SSH server logs for more detailed information about the problem. These logs often provide valuable clues about connection failures. Look for error messages that indicate specific issues, such as authentication failures, port conflicts, or network connectivity problems. You can often find log files in the `/var/log` directory on your IoT device.
Advanced SSH Features for IoT Devices
SSH offers a range of advanced features that can significantly enhance your ability to manage and interact with your IoT devices. These features go beyond basic remote access, enabling secure tunnels, port forwarding, and seamless file management.
- Tunneling: Use SSH tunneling to securely access services running on your IoT device, such as web servers or databases. SSH tunneling creates an encrypted connection between your local machine and the IoT device. This allows you to access services on the IoT device as if they were running on your local machine.
- Port Forwarding: Port forwarding allows you to forward specific ports from your local machine to the IoT device for remote access to services. This is particularly useful for accessing services that aren't directly accessible from the internet, such as internal web servers.
- SSHFS: Mount remote file systems on your local machine using SSHFS for seamless file management. SSHFS (SSH File System) allows you to mount a remote file system on your local machine. This creates a convenient way to manage and transfer files between your local machine and the IoT device. You can treat the remote file system as if it were a local drive.
Exploring these advanced features can unlock new possibilities for managing and interacting with your IoT devices, streamlining workflows, and improving overall efficiency.
Automation with SSH for IoT Devices
Automating tasks with SSH can significantly improve efficiency in managing IoT devices, freeing up valuable time and reducing the potential for human error. By leveraging automation, you can streamline operations and ensure consistency in device management. Here are some examples of effective automation strategies:
- Scripting: Write scripts to automate routine tasks, such as updating firmware or collecting sensor data. SSH allows you to execute commands and scripts remotely on your IoT device. You can create scripts in languages like Bash or Python to automate tasks such as downloading and installing updates, configuring devices, or collecting and processing data from sensors.
- Cron Jobs: Schedule SSH commands to run at specific intervals for regular maintenance tasks. Cron is a time-based job scheduler in Unix-like operating systems. You can use Cron to schedule tasks to run automatically at predefined times. For example, you can schedule a script to back up device configurations or check the status of critical services.
- Remote Monitoring: Use SSH to monitor device performance and health metrics remotely. You can use SSH to remotely monitor device performance metrics such as CPU usage, memory utilization, and network traffic. Monitoring these metrics can help you identify performance bottlenecks, detect potential issues, and proactively address problems.